CAL Kirby Part 3: Arms and Legs
- Sep 15, 2023
- 3 min read
Welcome back all. Hope you had fun working up the body last week. This week we'll be creating the arms and legs, two of each. This is when we'll really start to see all the pieces come together. At the end of today, you'll have four more pieces that look like this:
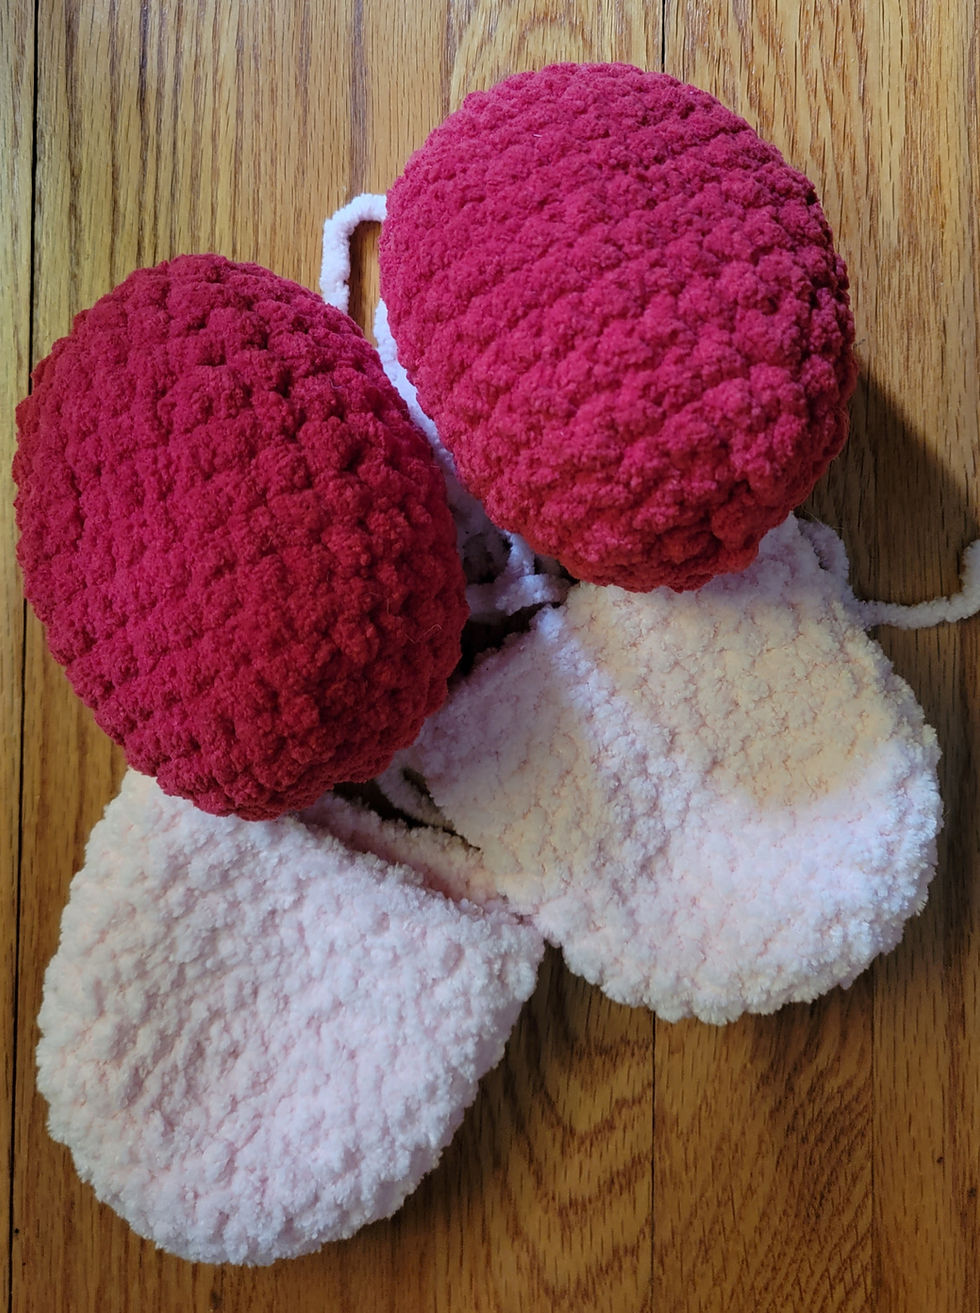
The materials and pattern are listed below.
Materials:
Big Twist Cuddles Yarn (pink and red)
Hook size K/6.5 mm
Stuffing
**Any yarn will work, so long as the hook size is one smaller than the recommended
Pattern - Arms and Legs:
Notes:
- The stitch count in a round is marked in the parenthesis at the end of each round.
- "x #" indicates the number of times to repeat the instructions in the parenthesis.
For example in round 3, "(Sc, Inc) x6 (18)" tells us to put a single crochet in the next stitch, followed by 2 single crochets in the following. Repeat this 6 times, for a total of 18 stitches in the round.
Abbreviations:
Sc - single crochet
Inc - increase (two single crochet in one stitch)
Dec - decrease (single crochet two stitches together)
Arms x2:
Round 1: Sc in magic ring (6)
Round 2: (Inc) x6 (12)
Round 3: (Sc, Inc) x6 (18)
Round 4: (Sc 2, Inc) x6 (24)
Round 5-12: Sc around (24)
Stuff lightly. Finish off. Leave a long tail for sewing.
Legs x2:
Round 1: Sc in magic ring (6)
Round 2: (Inc) x6 (12)
Round 3: (Sc, Inc) x6 (18)
Round 4: (Sc 2, Inc) x6 (24)
Round 5: Sc around (24)
Round 6: (Sc 3, Inc) x6 (30)
Round 7-11: Sc around (30)
Round 12: (Sc 3, Dec) x6 (24)
Round 13: Sc around (24)
Round 14: (Sc 2, Dec) x6 (18) **Begin to stuff
Round 15: (Sc, Dec) x6 (12)
Round 16: (Dec) x6 (6)
Finish off. Weave in ends.
At this point you should now have Kirby's body from last week, as well as two arms and two legs from this week. Ill instruct on the different ways to sew Kirbys arms and legs together below. I've given different placement options for the arms (at his sides or up) and feet (sitting or standing) depending on the pose you'd like your Kirby to be in.
Sewing:
Legs (Standing):
For sewing, we'll start with the legs. For this, we have two options, sitting or standing. If you would like your Kirby to be in a standing position, the legs will be sewn to the bottom of the body as shown:
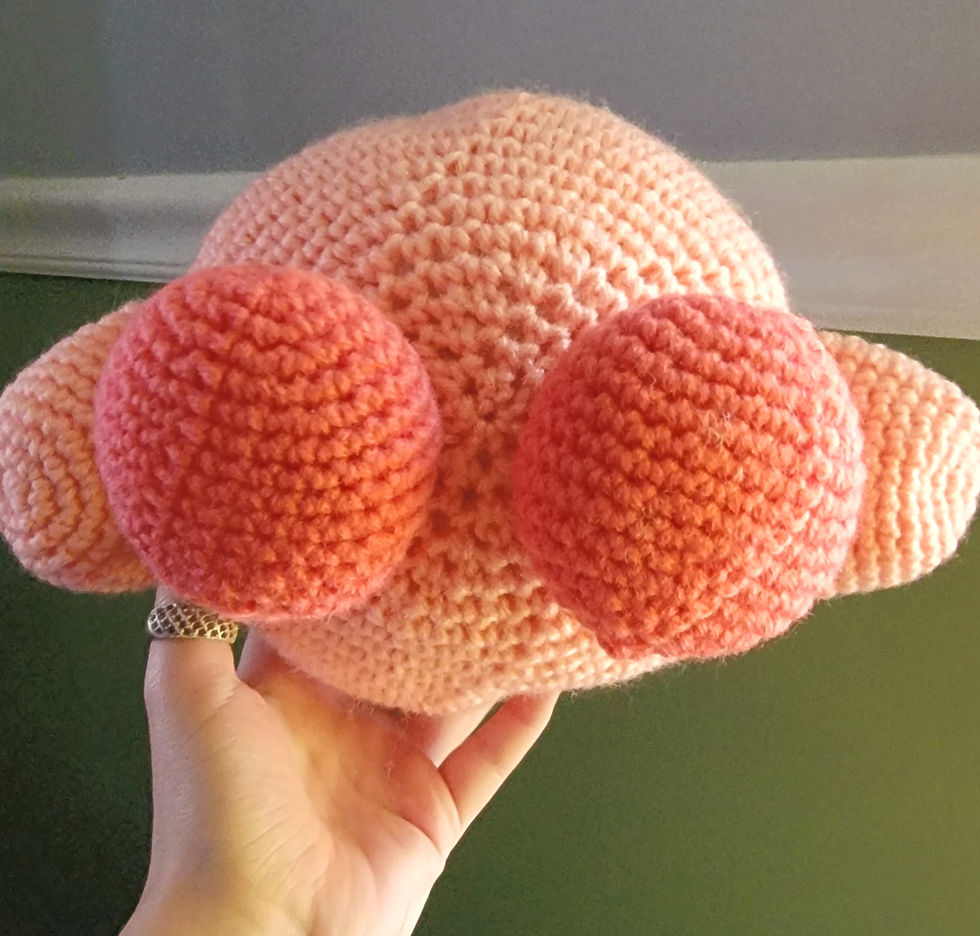
This may take some trial and error, as he can be somewhat top heavy, just be sure to place them in the middle, as well as giving a little space in between the feet, so that he can balance.
If you find this is not working, you may want to place something heavy (stones, marble pebbles,etc.) in Kirby's feet, so that they have some weight and are able to hold him steady. Not necessary, but it may help. Personally, I just make sure he is leaned up against something and he does okay, though yours may stand just fine!
Legs (Sitting):
If you would like your Kirby to be in a sitting position, the legs will be placed in front of the body, instead of on the bottom. The legs will be placed between rounds 19-23 of the body and the middle 5 rounds of the feet. Sew those five rounds together as shown:


Arms (Up):
For Kirby to have his arms up in the air we are going to sew the open arm, to rounds 9-15 of the body. Shown below as:

Arms (At his sides):
If you would like your Kirby to have his arms at his sides, there's one extra step before we sew the arms on. For this, you will have to sew the arms closed first. Take stitches from each side of the arm and sew shut in a straight line.
After you have done this, you can attach the arm to round 15, as shown:

What we've done so far:
Using these different methods there's multiple different combinations of Kirby you could make, personally, I've made two different Kirby's thus far along with all of you.
One Kirby is being made with acrylic yarn, in a standing position with arms at his sides.

Another is being made with the recommended yarn, with arms in the air in a sitting position.

Get creative with it. The first Kirby I made with this pattern looked like this! Sitting position, with one arm up and one arm down! Of course I've made some adjustments to the pattern since this guy, but don't be afraid to experiment with positioning.

And that's all for this week! Next week we'll be working on the details (eyes, blush, mouth, etc) and any other finishing touches. I look forward to seeing your completed Kirby's!
As always, tag me in your creations, send me a comment or DM if you have any feedback, comments, concerns and I will see you all next week! Happy crocheting.
Comments